CUTLASS-Cute 初步(2.1):Tensor & Layout 实操笔记
1. local_tile
给定一个 tiler,使用 local_tile 函数,将 Tensor 按 tiler 的 shape 切分成多个 tile。由于切分之后,每个 tile 保留输入 Tensor 的stride信息,以及rest mode的shape,故称为Inner-Partition。
1.1. 示例一:常规使用(常规 CTA 切分)
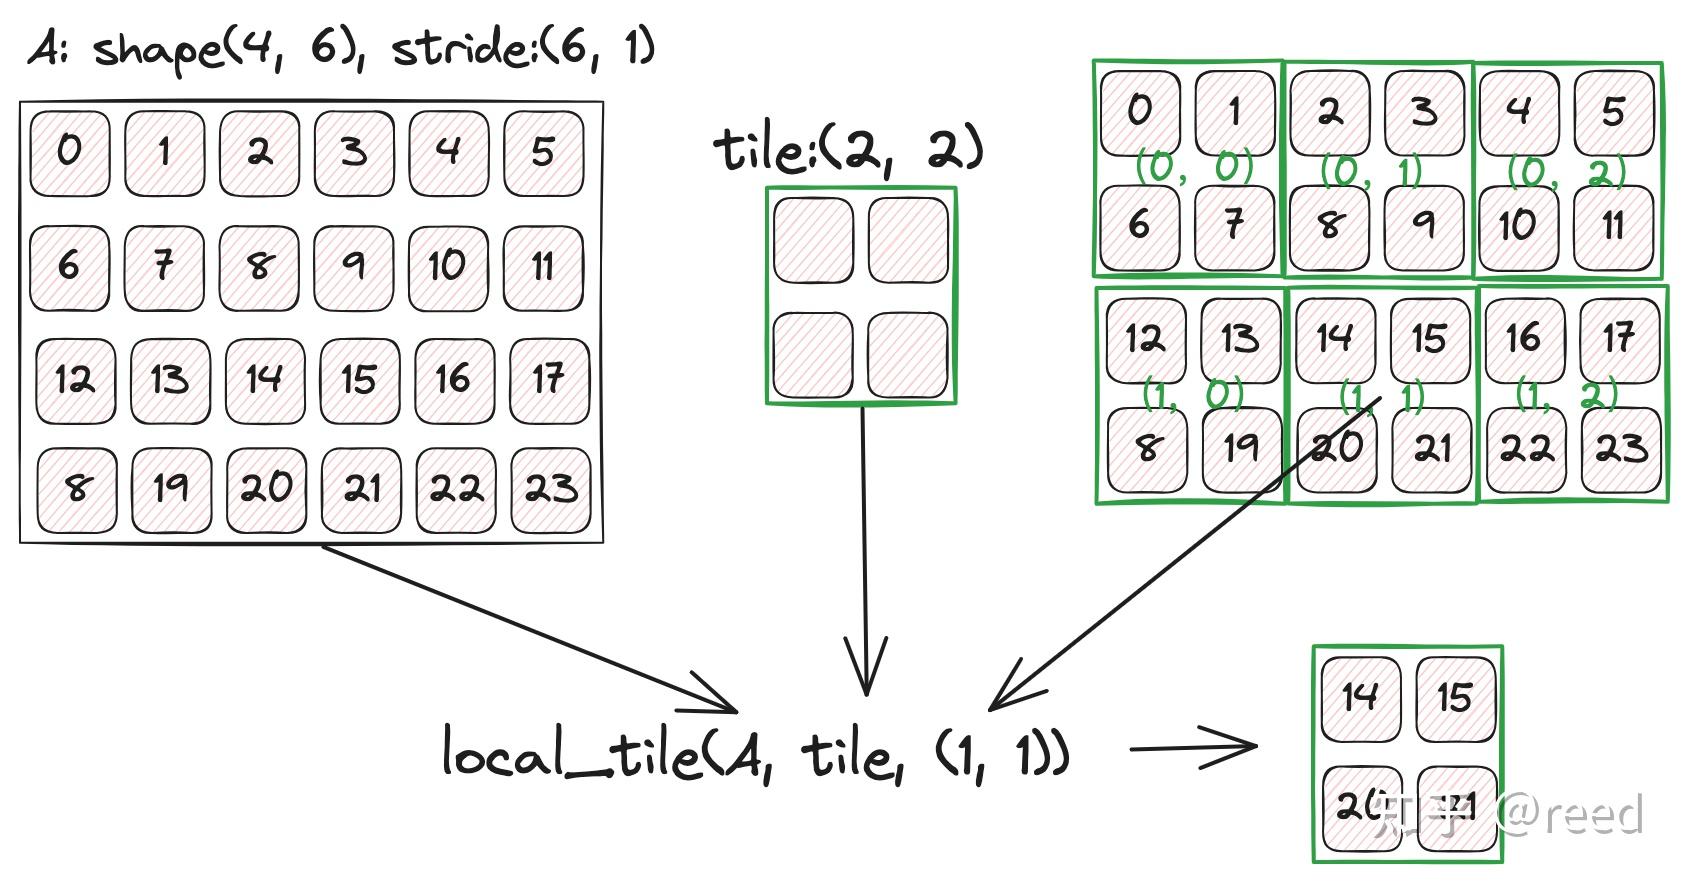
比如有一个 4x6 的 Tensor,将其切分并分配到 thread block,每个 thread block 获取到的 tile 大小为 (2,2),当前 thread block 的 coord 为 (1,1),就可以使用如下代码:
  constexpr int M = 4, N = 6;
  auto layout = cute::make_layout(cute::make_shape(M, N), cute::make_stride(N, cute::Int<1>{}));
  auto tensor = cute::make_tensor(h_data.data(), layout);

  constexpr auto tiler = cute::make_shape(cute::Int<2>{}, cute::Int<2>{});
  constexpr auto coord = cute::make_coord(1, 1);  // 第(1,1)块(0-indexed)
  auto tile = cute::local_tile(tensor, tiler, coord);

  cute::print(tile);
输出:
ptr[32b](0xaaaafc5faa38) o (_2,_2):(6,_1)
图示如下:
1.1.1. 输入 Tensor 轴数量多余于 tiler 的轴数量
下面测试输入 Tensor 轴数量多余于 tiler 的轴数量。测试代码:
  constexpr int M = 4, N = 6, K = 8;

  auto layout = cute::make_layout(cute::make_shape(M, N, K), cute::make_stride(N * K, K, cute::Int<1>{}));
  auto tensor = cute::make_tensor(h_data.data(), layout);

  constexpr auto tiler = cute::make_shape(cute::Int<2>{}, cute::Int<2>{});
  constexpr auto coord = cute::make_coord(1, 2);

  auto tile12 = cute::local_tile(tensor, tiler, coord);
  cute::print(tile12);
输出:
ptr[32b](0xaaab0eebc6f0) o (_2,_2,8):(48,8,_1)
1.1.2. 总结
local_tile的逻辑是:首先使用zipped_divide将输入 Tensor 切分,比如 输入 Tensor:(4,6,8):(48,8,1),使用 tiler(2,2)切分,得到:zipped_divide得到的结果是((_2,_2),(2,3,8)):((48,8),(96,16,_1))。 其中(_2,_2)表示每个 tile 的 shape 是 (2,2),(2,3,8)表示每个 tile 的 rest mode shape 是 (2,3,8),(48,8)表示每个 tile 的 stride 是 (48,8),(96,16,_1)表示每个 tile 的 rest mode stride 是 (96,16,_1)。最后根据 coord 获取对应的 tile。
zipped_divide返回一个 rank-2 的 tensor:
([tile mode], [rest mode])
| 顶层 mode | 内容 | 含义 |
|---|---|---|
| tile mode (mode-0) | (_2,_2):(48,8) | 一个 tile 内部的坐标系:2×2 个元素,stride 保留自原 tensor |
| rest mode (mode-1) | (2,3,8):(96,16,_1) | tile 外部的坐标系:有多少个 tile,以及未被切分的 trailing 维度 |
“rest”的字面意思是剩余,指”tile 坐标系之外剩下的所有东西”:
- 已切分维度的块编号(你选哪一块?→ 2 个 M 块 × 3 个 N 块)
- 未切分维度的完整范围(K=8 没有被 tiler 动过,直接挂在 rest 末尾)
如何切分,与 stride 没有关系,即选择前两个轴来切分,不是依照 stride 来选择轴(即与内存布局没有关系)。
完整测试代码:https://github.com/HPC02/cuda_perf/blob/master/src/study_codes/study_tests/test_local_tile.cu中的 Case03。
1.2. 示例二:在 coord 中使用 cute::_,得到该轴方向上的 tile 集合
使用cute::_作用于 coord 中的某个轴,其含义是获取该轴方向上的 tile 集合,即在该轴方向上,生成新的 trailing mode。示例代码如下:
  constexpr int M = 4, N = 6;

  auto layout = cute::make_layout(cute::make_shape(M, N), cute::make_stride(N, cute::Int<1>{}));
  auto tensor = cute::make_tensor(h_data.data(), layout);

  constexpr auto tiler = cute::make_shape(cute::Int<2>{}, cute::Int<2>{});
  constexpr auto coord = cute::make_coord(0, cute::_);

  auto tile00 = cute::local_tile(tensor, tiler, coord);  // (tileM, tileN, k)
  cute::print(tile00);
输出:
ptr[32b](0xaaaafd59bed0) o (_2,_2,3):(6,_1,_2)
从结果看到,在第二个轴上使用 slice 操作符,shape 中的最后一个轴 3 表示在该轴上有 3 个 tile。
完整测试代码:https://github.com/HPC02/cuda_perf/blob/master/src/study_codes/study_tests/test_local_tile.cu中的 Case04。
1.3. 示例三:tiler 中使用 Step筛选 tiler 以及 coord,使用 cute::X 标记的轴不参与切分
Step 本质上是一个轴选择器,筛选出需要的 tiler 以及 coord,使用 cute::X 标记的轴不参与切分。
  constexpr int M = 4, N = 6, K = 8;
  constexpr auto problem_shape = cute::make_shape(M, N, K);

  auto stride_A = cute::make_stride(K, cute::Int<1>{});
  auto layout_A = cute::make_layout(cute::select<0, 2>(problem_shape), stride_A);
  auto tensor_A = cute::make_tensor(h_data.data(), layout_A);

  constexpr auto tiler = cute::make_shape(cute::Int<2>{}, cute::Int<2>{}, cute::Int<4>{});
  constexpr auto coord = cute::make_coord(0, 0, cute::_);

  // tile_A (tileM, tileK, k)
  auto tile_A = cute::local_tile(tensor_A, tiler, coord, cute::Step<cute::_1, cute::X, cute::_1>{});
  cute::print(tile_A);
输出:
ptr[32b](0xaaaafe0c3860) o (_2,_4,2):(8,_1,_4)
即得到一个 MK 方向的 tile(2, 4) 的集合,K 方向上有两个 tile,这两个 tile 在 M 方向上坐标为 0(划分成 2*2 个分块)。
另外,在 cute::Step<> 中使用 cute::X 标记的轴不参与切分,例如:
// tiler rank=2,Step<_1,X> 表示只切第0维,第一维整体保留
local_tile(tensor, make_shape(Int<2>{}), coord_m, Step<_1, X>{});
2. local_partition
local_tile与local_partition都是基于zipped_divide(得到([tile_mode], [rest_mode])),区别在于:local_tile第二步是切入 rest_mode,而local_partition第二步是切入 tile_mode。即:
-
local_tile:先切分得到 tile 和 rest,然后根据 coord 从 [rest_mode] 中选取一个 tile(保留[tile_mode])。 -
local_partition:先切分得到 tile 和 rest,然后根据 tid 从 [tile_mode] 中选取一个 tile(保留[rest_mode])。
图示zipped_divide的结果:
tensor_tiled 的结构:
  mode-0 (tile mode): 大小 64,标记内部元素编号 0..63
  mode-1 (rest mode): 大小是 "有几个这样的块"

访问方式:tensor_tiled(i, j)
   i = 块内第 i 个元素
   j = 第 j 个块
local_tile的行为:
tensor_tiled( _,  j=blockIdx )
              ↑   ↑
           全取  固定"哪个块"
local_partition的行为:
tensor_tiled( i=tid,  _ )
              ↑        ↑
           固定"我在   全取"所有块"
           块内的位置"
另一个差异点是local_partition是交错分配数据到不同线程的(内存合并访问),而local_tile是连续分配数据到同一个线程的,如下图示:
原始 tensor (BM=64, BK=16):
┌────────────────────────────┐
│  0  1  2 ...              │  ← BK=16 列
│ 64 65 66 ...              │
│ ...                        │
│                            │  ← BM=64 行
└────────────────────────────┘

local_tile:  选出某个矩形块(连续区域)
             ┌──────┐
             │ tile │  ← 这个 CTA 的全部数据
             └──────┘

local_partition: 从整个矩阵中取 tid 对应的行(交错分配)
             行0  → tid=0
             行1  → tid=1
             ...
             行63 → tid=63
             每个 tid 得到 1 行 × 16 列 = 16 个元素
示例代码:
  constexpr int M = 8, K = 6;

  auto layout = cute::make_layout(cute::make_shape(M, K), cute::make_stride(cute::Int<1>{}, M));
  auto tensor = cute::make_tensor(h_data.data(), layout);

  constexpr auto thr_layout{cute::make_layout(cute::make_shape(cute::Int<4>{}, cute::Int<2>{}))};
  auto partition = cute::local_partition(tensor, thr_layout, 1);  // (2,3):(_4,16)
  cute::print(partition);
由结果可知,local_partition将 tensor 沿着 mode-0 切分成四块,每块两行,交错分配给四个线程;沿着 mode-1 切分成两块,每块三列,交错分配给两个线程。
是用 cute::Step<> 来选择切分轴,例如:
auto partition = cute::local_partition(tensor, thr_layout, 1, cute::Step<cute::_1, cute::X>{}); // (2,6):(_4,8)
此时,只沿着 M 轴切分成四块,每块两行,交错分配给四个线程;K 轴不切分,整体保留。
2.1. local_tile 与 local_partition 对比总结
| 步骤 | local_tile (inner) | local_partition (outer) |
|---|---|---|
| 步骤一 | zipped_divide(tensor, tiler) → ([tile], [rest]) | 同左 |
| 步骤二 | 用 coord 索引 [rest],消掉块编号维度 | 用 tid 索引 [tile],消掉块内位置维度 |
| 返回内容 | 第 coord 号块内部的所有元素 | 所有块中位置为 tid 的元素集合 |
| 语义 | “我是第几个 CTA,取走我的 tile” | “我是第几个线程,取走我的元素” |
“inner/outer”这两个别名也恰好反映了这个区别:inner 返回块的内部,outer 返回块的外部视角(跨块的分布)。
参考代码见:https://github.com/HPC02/cuda_perf/blob/master/src/study_codes/study_tests/test_local_partition.cu。
A. 资料
Enjoy Reading This Article?
Here are some more articles you might like to read next: